
How to: MySQL as a linked server in MS SQL Server
This document describes how to link a Microsoft SQL Server and a MySQL server by using the ‘linked server’ feature in SQL Server.
This document describes how to link a Microsoft SQL Server and a MySQL server by using the ‘linked server’ feature in SQL Server. After linking, tables on both servers can be referenced in one SQL query or stored procedure, with the MySQL database behaving as if it was a local SQL Server database.
This technique can be useful for synchronizing MySQL-driven web pages with data held locally in a Microsoft SQL Server. The document contains an example which uses triggers to automatically propagate any changes to the content of a SQL Server table to a linked MySQL table.
[UPDATE 2010: This article is now over five years old and refers to SQL Server 2000. For the newer versions SQL Server 2005 and 2008 most of the article is still applicable, but there is a slight change in the procedure when using the new SQL Server Management Studio.
You must now first create an ODBC System DSN that contains all information to connect the MySQL server and then refer to this DSN from the Linked Server dialog when you are creating the linked server. Also, Linked Servers are now located under ‘Server Objects’->’Linked Servers’ in the Management Studio. Finally, provider options are set on the provider level in the Management Studio under ‘Linked Servers’->’Providers’->’MSDADQL’]
[UPDATE 2015: This article is now over 10 years old and is probably a bit outdated. Please be aware of this 😉 ]
Introduction
This document describes how to link a Microsoft SQL Server 7.0/2000 (MS SQL) and a MySQL 4.x server. After linking, the linked MySQL server behaves as if it is a local SQL Server. Having linked the two servers, examples of some things you could do are automatically synchronizing each Update/Insert/Delete on the MS SQL database immediately in the tables on the linked MySQL server or write a SQL query that uses tables and data on both servers simultaneously.
To perform this procedure, you require:
- Microsoft SQL Server 2000 or 7.0.
- MySQL 4.x. The server must have transaction support, which is included in versions 4.x and newer. The linking is possible against both InnoDB and MyISAM tables.
- Communication between the MySQL server and the MS SQL Server on TCP port 3306. TCP port 3306 is the default port; you can use a different port if you want to.
- MyODBC 3.51 installed on the MS SQL Server box. A separate DSN is not required. You can find the latest MyODBC release at http://dev.mysql.com/downloads/connector/odbc/3.51.html.
This How-To describes how to perform the linking process and was written by Daniel Roy (daniel.roy@infi.nl). Comments and additions to its content are more than welcome and can be mailed to Daniel.
Why do I want to do this?
Many companies run a mostly Microsoft based network locally and thus use Microsoft’s SQL Server for storing their local databases. On the other hand, the Apache/MySQL combination is very popular for storing website databases on the Internet, especially in combination with PHP as a server-side scripting environment (the so-called LAMP configuration).
Now, often the need arises to link the contents of these two database environments, for instance to synchronize what’s happening in the office to what people can see on the web or to combine website obtained data with local office information. Sometimes this linkage has to happen at set times or intervals, but it may also be triggered by a change in data.
An example of the above would be a shipping company that processes orders and stock changes locally and stores this data on their local SQL Server. Clients want to see this data on the web with the least possible delay: if something has been shipped or has come in stock, this has to be shown on the companies’ web pages as soon as possible. The web pages, however, use a MySQL database for data storage. This situation requires a link between the local MS SQL Server and the MySQL server on the web, so that changes to information in the MS SQL Server can immediately be propagated to the web database.
One option to implement such a link is by using MS SQL’s ‘linked server’ feature. This feature allows you to link any ODBC-accessible database server to the SQL Server. After having performed this link, the linked server can be accessed in MS SQL as if it was a local SQL Server.
Advantages of this approach are:
- Centralized administration of the database synchronization. All components of the synchronization process can be administered from one location, i.e. the SQL Server Enterprise Manager.
- Support for triggers. MySQL doesn’t support triggers, but SQL Server does. After linking, this means synchronization between the two databases can be triggered by changes in the data on the SQL Server, allowing very tight synchronization of the two databases involved.
- Better administrative tools. The SQL Server Enterprise Manager and Query Analyzer can be used to edit and administer the linked MySQL database. Of course, if you’re an M$ basher, this is a disadvantage.
How?
To demonstrate the procedure we’ll create two identical tables, one on the SQL Server and one on the MySQL server. After that we will link the SQL Server to the MySQL server and use a trigger to automatically propagate any changes made on the SQL Server table to the MySQL table. The most important step is step 3, the linking of the two servers. Once this link has been made, tables on the MySQL server can be accessed in virtually the same way you would access the local SQL Server tables.
3.1 Step 1: Create table in SQL Server
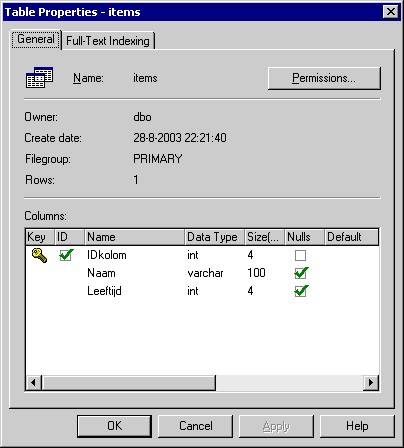
For this example we first create a table in SQL Server according to the above figure. (Please excuse the column names: this document was originally prepared in Dutch. ‘Naam’ translates to ‘Name’ and ‘Leeftijd’ translates to ‘Age’). We will synchronize all changes to the contents of this table automatically to a MySQL Server, which could, for instance, be located on the Internet.
3.2 Step 2: Create an identical table in MySQL
We create the same table on the MySQL server. See the figure below.

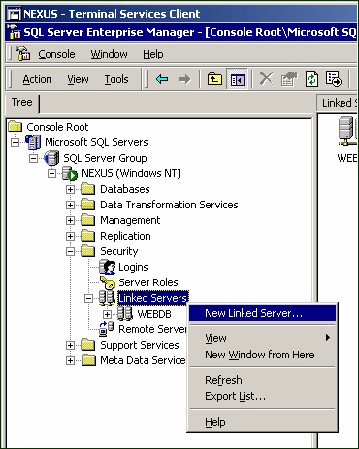
3.3 Step 3: Create linked server in MS SQL Server
This is the core step in the process: the actual creation of the linked server. To do this, in the Enterprise Manager, go to the folder Security and open the context menu of the item ‘Linked Servers’. In this menu, choose the option ‘New Linked Server’.
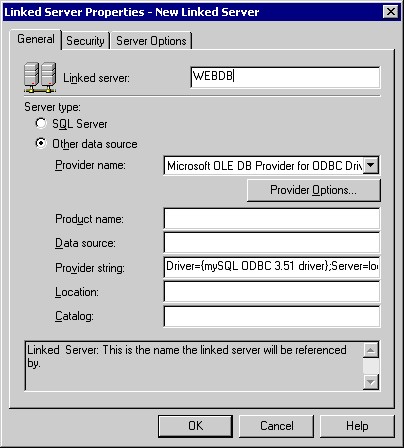
The dialog ‘New Linked Server’ appears. In the dialog, enter the following values:
- Linked server: A name to identify this linked server. You can choose this value as you wish.
- Server type: Choose the option ‘Other data source’.
- Provider name: Choose the option ‘Microsoft OLE DB Provider for ODBC Driver’.
- Provider string: Enter the following text: Driver={MySQL ODBC 3.51 driver};Server=;Port=3306; Option=131072;Stmt=;Database=;Uid=;Pwd=
In this text, replace the placeholders , , , by the IP address of the MySQL server, the database name on the MySQL server, the login and the password on the MySQL server respectively.
Some tips:
- Remember that Linux and MySQL are case-sensitive when it comes to user names, database names, etc.
- We haven’t tested this for spaces or other irregular characters in the password. If anyone has any experience with this, please let us know
- IMPORTANT. The login and password for accessing the MySQL server are visible in plain text to anybody who can view the properties page for this linked server in the Enterprise Manager. We strongly advise to create a separate login and password for the linking between MySQL en SQL Server and to restrict the rights of this account as much as possible. Also, try to grant access to the Linked Server properties in the Enterprise Manager to as few people/logins as possible.
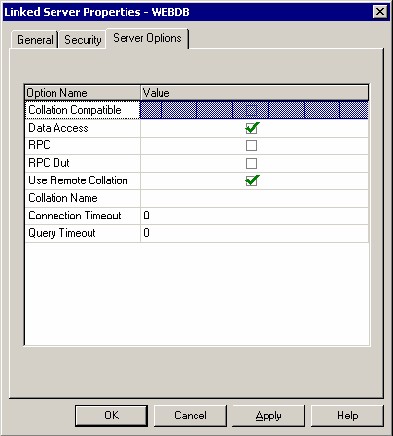
Don’t click OK yet! First, click on the button ‘Provider options’ and set the options as shown below:

Click on OK to save the Provider options. Leave the default settings for the Security tab unchanged and set the options on the Server Options tab as shown to the right. Finally, click OK. The linked server has now been created.
3.4 Step 4: Create triggers on the SQL Server table
To now access data on the linked MySQL database, you use the SQL Server OPENQUERY function where you would normally use a table name. This function takes two arguments: the first one specifies the linked server containing the data and the second argument is a SQL query which should return the data on the linked server you want to access or modify. So, for accessing the table [RemoteTable] on the linked server [LinkedServer], use the syntax:
OPENQUERY ([LinkedServer], 'SELECT * FROM [RemoteTable]')
Anywhere you would normally enter a table name in your SQL code, you can now enter the above construct and the statement will behave as if [RemoteTable] is a local table on the SQL Server. You can access, edit and delete data in [RemoteTable] from your MS SQL Server stored procedures and other SQL code without being bothered by the fact that it actually lives on a different server and database.
To illustrate this, we’ll add some triggers to our SQL Server example table which will synchronize any changes made to the contents of this table to the same table on the linked MySQL database.
Enter and execute the following SQL statements in the SQL Query Analyzer:
CREATE TRIGGER items_insert ON [dbo.items]

FOR INSERT

AS SET XACT_ABORT ON

INSERT INTO OPENQUERY(WEBDB, 'SELECT * FROM items')

SELECT IDkolom, naam, leeftijd FROM INSERTED

GO

CREATE TRIGGER items_update ON [dbo].[items]

FOR UPDATE

AS

SET XACT_ABORT ON

DELETE FROM OPENQUERY(WEBDB, 'SELECT * FROM items')

WHERE IDkolom IN (SELECT IDkolom FROM DELETED)

INSERT INTO OPENQUERY(WEBDB, 'SELECT * FROM items')

SELECT IDkolom, naam, leeftijd FROM INSERTED

GO

CREATE TRIGGER items_delete ON [dbo].[items]

FOR DELETE

AS

SET XACT_ABORT ON

DELETE FROM OPENQUERY(WEBDB, 'SELECT * FROM items')

WHERE IDkolom IN (SELECT IDkolom FROM DELETED)

GO
If you find yourself using a certain table on a linked server often, you could consider creating a view on the local SQL Server which contains the appropriate OPENQUERY function. You could then use the View name in your SQL code instead of the OPENQUERY syntax, saving you some typing. Also, using this technique, if the table name on the linked server or the name of the linked server were ever to change, you would only have to modify your code in one place, the View. This could increase the maintainability of your code.
3.5 Step 5: Insert data into the SQL Server table
To test if everything is working properly, you can INSERT a row in the SQL Server table and check if the same INSERT has also been executed on the linked MySQL server. This should happen almost immediately. The link is now complete!
Donwload
How to: MySQL as a linked server in MS SQL Server in PDF-format
Vond je dit interessant?
Meld je dan aan en ontvang onze maandelijkse updates via e-mail over hippe tech, learnings uit toffe projecten, een kijkje achter de schermen, of upcoming events.