Writing a TCP proxy using Netty and Clojure
In this post I explore an ancient art: network programming at the TCP level. I’ll show how to use Netty and Clojure to build a TCP proxy server, while documenting my learnings along the way!
Disclaimers:
- This is a long post, sorry!
- This is not an introductory tutorial to Netty, please read their guide for that. I wrote this post as a reference for my future self and people running into similar issues.
- Not all information about Netty might be accurate: I reverse engineered some of the findings and here and there might have made some assumptions.
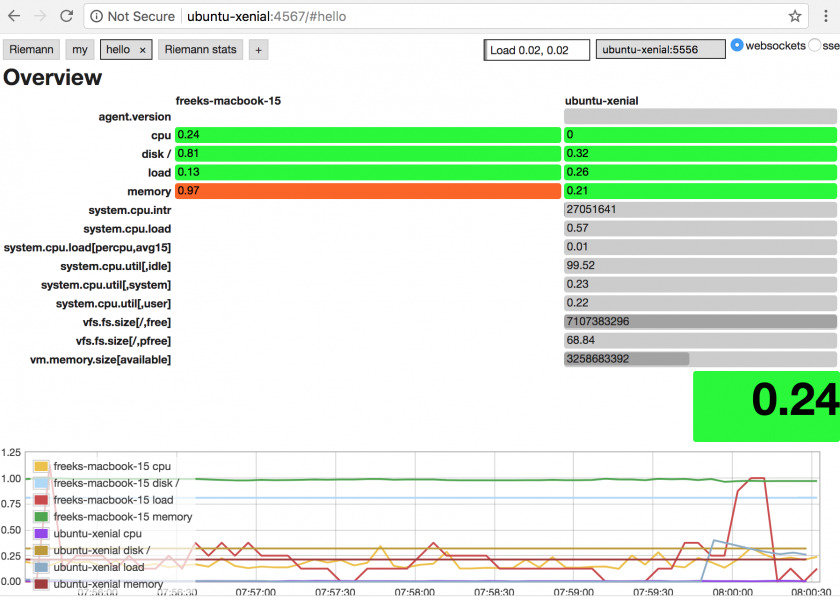
I recently discovered Riemann, a monitoring solution with advanced stream processing capabilities. While the functionality of Riemann is out of the scope for this post, the basic idea is that you take in events (such as the current CPU utilization for a given server) and perform arbitrary calculations over a stream of those events. This allows you to for example count the rate of incoming events, the moving average of the value, etc. Finally, at the end of the stream it allows you to send the calculated value to a target, for example notify someone through e-mail, or send it to Graphite. I urge you to check Riemann out, it’s awesome and very easy to get started with.

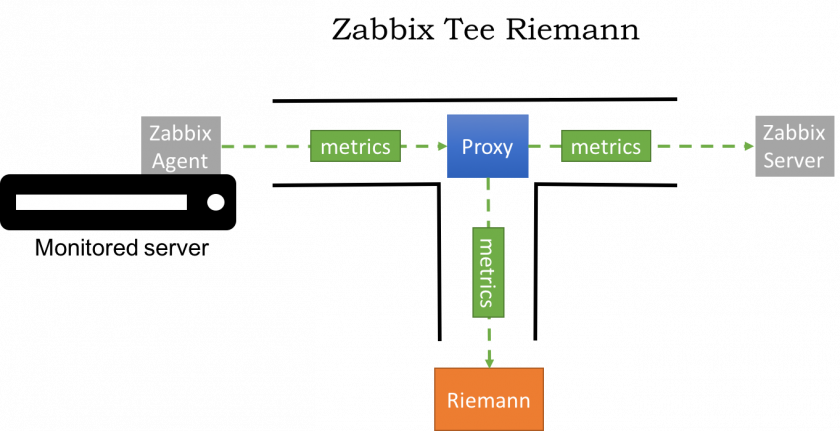
Now, at Infi we mostly rely on Zabbix for monitoring our internal and customer systems. While Zabbix is far from perfect, it does the job and we’re not sure if there is something else that doesn’t have its shortcomings. One of Zabbix’ biggest problems (for me) is its charting capabilities, and for a while I’ve tinkered if it would be possible to have its data available in Graphite (which is great for charting/visualization of time series data). I didn’t find an easy solution though, so gave up. With Riemann, however, I saw new possibilities: what if I could get our Zabbix data into Riemann and then have Riemann forward it to Graphite? I googled a bit if something was already available, but couldn’t really find anything I could use, so decided to cook up something myself. The idea was to intercept/man in the middle Zabbix agent to Zabbix server communication and forward any metrics to Riemann. How hard could it be?

Harder than expected of course 🙂 To keep the length of this post somewhat in check, I’m gonna focus just on writing a generic TCP proxy server. The result of the Zabbix -> Riemann interceptor is in this repo though: https://github.com/FreekPaans/zabbix-tee-riemann. Beware that it works, but is not really polished yet. The main thing that it does over a generic proxy is interpret the Zabbix message format and forward the metrics found in that data to Riemann.
As my language of choice these days is Clojure, I was gonna (try and) write the proxy in Clojure as well. After some looking around, Netty seemed to be the de facto standard for doing TCP work on the JVM, so that was what I was going to use. For my professional work I’ve mostly done Java over the last half a year, and what I found out is that while most of the libraries are of excellent code quality, the documentation (especially the getting started parts) is generally deplorable. This is really a shame, because it hurts adoption of the libraries. Netty is no different: it works excellent, but it’s really hard to get a picture about how it works and how to use it properly. Getting things to work was mostly about figuring out how Netty works by going through the JavaDocs, GitHub issues and its source code. I could probably just have used their proxy example, but what’s the fun in using something if you don’t understand why/how it works? So I guess the rest of this post is mostly about explaining how that example works, yet translated to Clojure.
Please note that everything related to Netty is about version 4.1.*.
Netty: A (hopefully brief) overview
From Netty’s website: Netty is an asynchronous event-driven network application framework. Just to be clear: Netty is written in Java, not Clojure. Netty revolves around a couple of primitives (at least, in my usage of it):
Channels
Channels are the primary way to send and receive messages in Netty. It provides methods such as send() and read(). If you’re familiar with socket programming, think of them as wrappers around sockets, with additional functionality.
Pipelines
Each channel has an attached pipeline, both for reading and writing messages. Pipeline elements (called handlers) transform messages before they are read (delivered in your own code) or written out to the wire.
Channel handler contexts
The context is passed in to any of your handler’s methods, and can be used to get a reference to the channel or forward a message onto the next pipeline handler.
For inbound handlers, you can use the context’s fire* methods (e.g. fireChannelRead()) to pass on the event to the next event in the pipeline. For outbound events it’s write(), read(), connect() and friends. If you don’t call any of these methods, event processing stops.
Channel futures
Whenever you invoke an outbound action, such as read(), bind(), connect() or write() you’ll receive a ChannelFuture. This is because Netty is asynchronous, so an operation will never block. Whenever you rely on some operation completing (either successfully or not), you can use the future to schedule a function to be called when the operation actually completes.
Event loop
Every channel has an attached event loop that processes the events for that channel, generally in the same order that they are submitted to the event loop. For example, the NioEventLoop is implemented by doing the the NIO Selector magic. Note that multiple channels can share the same event loop.
Event loop groups
An EventLoopGroup manages EventLoops. It makes sure Channels have an associcated EventLoop, and that those EventLoops are scheduled to run on a Thread from a ThreadPool that the group also maintains.
Bootstrap
A bootstrap is used to set up either a server (using ServerBootstrap) or a client (using the regular Bootstrap). It configures the channels, sockets and whatever else is needed such that you can use it do what you want to do: send and receive messages.
Lessons learned about Netty
I think it might be useful to share some of the things that confused me about using Netty, so here it goes.
The Pipeline
The pipeline was one of the hardest things for me in Netty to wrap my head around. First of all, we need to distinguish between inbound and outbound events: inbound events are things that have happened, for example data was read or a channel became inactive. Outbound events are things that you trigger yourself: writes, connects, disconnects, etc.
One thing that confused me was that read is actually an outbound event. Invoking read means that you want to read from the underlying socket. Once data is actually available and read from the socket, the fireChannelRead inbound event is fired, containing the data. So inbound and outbound events have nothing to do with the direction of the flow of data, which is what I assumed. What put me on the wrong foot even more is that the AUTO_READ socket option is enabled by default, which means that channelRead events start flowing automatically (no need to invoke read()).
Another thing that confused me was that inbound and outbound events pass through the pipeline in opposite direction. So inbound events start at the top of the pipeline, while outbound events start at the bottom. (I’m not 100% sure why this is so, I think it allows you to “short circuit” the pipeline such that when you invoke for example a write in in inbound handler, you only go through the outbound handlers that are on top of the current handler).
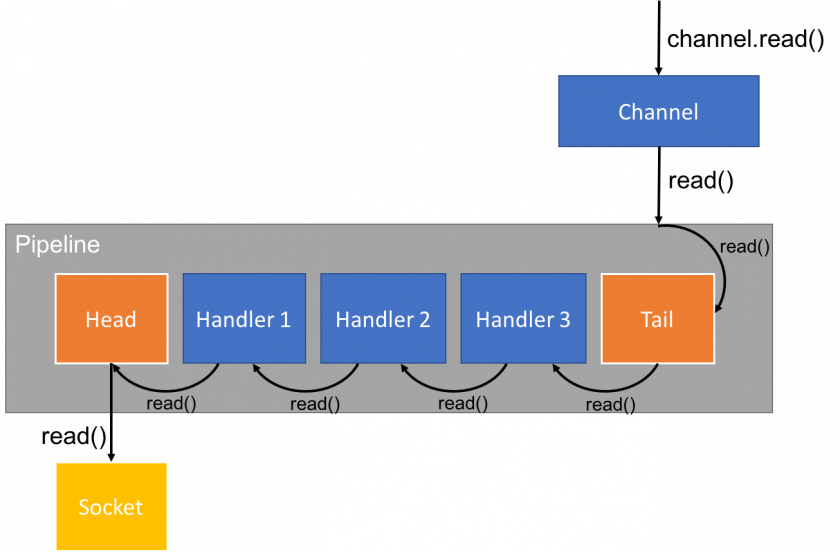
So as an example, here is what happens when you invoke read() on a channel, indicating that you want to read data from the connection.

Head and tail are implicit handlers provided by Netty, and are invisible to you (unless you inspect the source). They provide functionality such as logging unhandled exceptions (note that every handler can stop propagating the event, including an exception event), or invoking the outbound requests to the underlying socket/transport. Handlers 1, 2 and 3 are provided by you and allow you to do whatever you need with the incoming request. In the case of read(), that probably won’t happen too often, but for a write(), this is where you would transform your message into bytes.
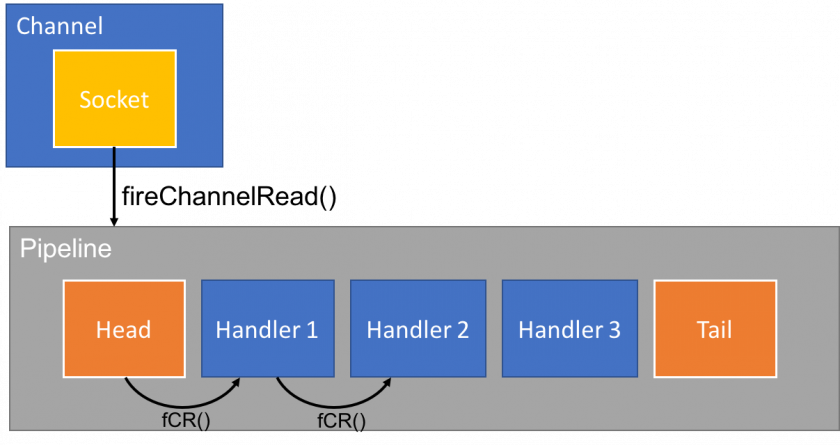
As for an inbound event (let’s say after you requested a read()), the following happens.

Here, a portion of data is read by the socket, and the portion of code that is processing events on the underlying socket invokes fireChannelRead() on the Channel’s Pipeline. The pipeline in turn passes it on to the Head handler onwards to our own handlers. Now, contrary to the read() example the event doesn’t make it to the end of the pipeline, since Handler 2 absorbs the message and presumably does something useful with it.
The handler context
What I found confusing about the context is that in the official documentation sometimes context.write() is used to write something back in an inbound handler, but at other times it’s context.channel().write(). The difference is that in the latter the write passes through the entire pipeline, while in the former it only passes through the handlers that are “above” the current handler. I’m not entirely sure when that would be useful.
Writing the proxy
With that somewhat lengthy introduction (sorry!) it’s now time to actually write the proxy. If you’re not familiar with Clojure, no worries: it’s pretty much analogous to the Java example from Netty itself.
The first step is writing something that will actually accept connections, we do this by defining a function for starting a server:
On line 2 we create a NioEventLoopGroup, which is a standard EventLoopGroup that allocates a number of threads based on the number of CPU cores you have. On line 3 we invoke a function that creates the server based on the event loop implementation and handlers-factory, which is a function that creates the pipeline handlers. Then we bind this server to port 9006. bind() is a function that returns the before-mentioned ChannelFuture, and in this case we want to do a blocking wait on its completion, which is done by the sync function. We then bind the name channel to the created channel, and add a listener to its close future (a future that is completed when the channel is closed), which cleans up the resources used by the event loop. Finally we return the channel.
init-server-bootstrap is a bit more interesting:
We create the ServerBootstrap, set its event loop group to the provided group, specify NioServerSocketChannel as the channel class (NioServerSocketChannel is a channel implementation based on Java’s non blocking IO (nio) API), set a handler for children and then set some options (more on those later).
A server has one “main” channel (also called “boss” channel in Netty nomenclature) which it uses to receive new connections, and then passes those connections on to “child” channels which are used for the rest of the communication. The childHandler specifies the handler that the server uses for those child channels. Our handler is one that adds the result of invoking handlers-factory to the end of the pipeline. Note that we invoke handlers-factory for every incoming connection, so handler instances are not shared between connections.
We can now invoke this code as follows, this will start the server with a handler that logs all events.
Great, We now have working TCP server! It just doesn’t do that much. The next step is creating a handler that forwards incoming data to another server:
This handler will be used for the “child” channels, so once per incoming connection. Quite a bit of code, let’s break it down. First of all, this function takes the target host and port as an argument. Then on line 3 it creates a Clojure atom to store the channel that is created between the proxy server and the target server. This channel needs to be shared between the various ChannelInboundHandlerAdapter overridden methods, which is why we introduce it at this scope.
Then we’re creating a Clojure proxy (think of a subclass) for ChannelInboundHandlerAdapter, which we can use to intercept inbound events. For the proxy, we’re interested in channelActive, channelRead and channelInactive.
channelActive
As the name implies, the channelActive event is raised when the channel has just become active. It can be used to run any setup logic associated with this channel. In our code, we use this to set up the connection to the target server.
First we call connect-client on line 3, which connects to the target server and returns a future for the connect result. On line 4 we add a future listener which checks the status on line 7 (a potential failure might be that it couldn’t resolve the target host name), and if success (line 8-10) it updates the outgoing-channel atom with the outgoing channel, and invokes read on the incoming (the client to the proxy) channel. If there is a failure, it closes the incoming channel (line 11). It could be useful to return some form of error condition to the client here.
Why is it necessary to manually invoke read on line 10? Remember that we set a childOption ChannelOption/AUTO_READ to false in init-server-bootstrap. This means we need to invoke read manually. The reason we do this is twofold: first, we cannot process any read data when there is no connection to the target system. Second, we don’t want to ingest more data than we can send to the target system, which is why we only call read once a write to the target system has succeeded in channelRead.
channelRead
The channelRead event is raised when data has become available on the channel. The only thing we need to do when this happens is forward this data to the target. This is quite easy: we invoke writeAndFlush on the outgoing channel on line 3. We call writeAndFlush instead of just write since the flush makes sure the data is actually going to be sent over the wire.
We add a listener to the result of the write on line 5, and check for success on line 7. If writing was successful, we read more data. As mentioned earlier, this makes sure we only ingest as much data as we can write. Should the write have failed (due to connectivity problems, exceptions in other parts of the pipeline, etc), we write an empty message to the channel and when that write completes, we close it. This is needed because Netty maintains an internal outbound messages buffer, and by closing the channel only after that empty message has completed, we make sure all outbound messages are actually put on the wire.
channelInactive
As implied, channelInactive is raised when our own channel is closed. In this case, we check if the channel atom was set up (I think the only case where this wouldn’t be the case is when connecting to the target system failed), and if so we flush any pending writes to the target system and then close the channel.
To be complete, this is the code for flush-and-close:
We need to write -something- so we use Unpooled/EMPTY_BUFFER, and then add a predefined listener that just closes the connection. It’s equivalent to
That’s it for the incoming handler. We’ve seen most of the building blocks for the connection to the target system as well. First of all connect-client:
source-channel is the channel we already have, the connection to the proxy. The other arguments indicate the target. We now use Bootstrap instead of ServerBootstrap since we’re setting up a client, not a server. On line 4 we reuse the event loop group we created earlier (no need to create a new one), and we also use the same channel class (NioSocketChannel). We set the same options as for the child channels, and then add a handler made by client-proxy-handler. Finally we connect to the target on line 17. Remember that connect returns a ChannelFuture.
The interesting stuff happens in the handler:
Remember source-channel is the original client channel.
In channelActive we immediately invoke a read. We still don’t want AUTO_READ here, but contrary to above, we can start reading straight away (since there’s no external connection to be set up). When the client becomes inactive we once again flush and close the source channel in channelInactive.
Finally, when data is read in channelRead, we forward the data to the source channel. This is completely the same as above: we writeAndFlush, on success we read more and when failed we flush our own connection and then close it.
That’s it! We now have a fully functioning TCP proxy. To start it, evaluate
And try it out:

AUTO_CLOSE
So far, almost everything is identical to the example provided by Netty. There is one difference: we have disabled AUTO_CLOSE on both channels. To understand this, it’s important to understand that the way we detect a TCP termination from user code is by invoking a read() on the underlying socket. OTOH, dropped connections can only be detected by writing to the socket. Now, setting AUTO_CLOSE to true instructs Netty to close the channel whenever a write error has occured. In itself, this is fine since we can assume the connection is broken when a write error occurs and therefore want to close the channel.
There is a problem, however: there might still be some data left in the socket’s receive buffer at the OS level, which gets discarded if we close the channel straight away on write error. It turns out our current code doesn’t handle that correctly yet, but in a follow-up post I’ll show how to do it correctly.
Conclusion
With about 120 lines of code, writing a TCP proxy with Clojure and Netty seems quite easy. Unfortunately, the documentation of Netty wasn’t as good as it could be, so it was a bit harder then that code size might imply. OTOH, the fact that it can be written in only that many lines of code indicates that Netty itself is pretty good. I hope this post can help other people figure this stuff out a bit quicker, let me know if it helped you!
For the progress on the Zabbix to Riemann proxy check up on the repo.
The full source code is available at https://github.com/FreekPaans/clojure-netty-proxy/blob/master/src/clojure_netty_proxy/core.clj.
