
Automating iOS app testing (part 1)
While implementing features and fixing bugs, we tend to only test the happy flows and simply overlook scenarios that can lead to some nasty bugs. But it doesn’t have to be this way!
Of course we have Dirk to test and break every feature (and he will), but even he sometimes misses an edge case and does not have infinite time to replay his test script. Luckily we have some alternatives to Dirk. One way is automated tests. During development we create automated tests to ensure predefined scenarios or edge cases. This may either be a script to perform UI tests in the app, but also test code that ensures how code in the app reacts to certain scenarios.
Most of the iOS apps we develop are very dependent on an API. A common pattern is that the automated tests also use a real API instance, but then what is the exact scope of your tests and how do you guarantee the begin and end state of your test?
In this blog I’ll show you some other ways to make API-heavy app testing way easier. The examples I use are snippets of a test project located on my GitHub repo.
Real API
A naive and easy way to start testing your app, is just to make those calls to the real production API, or better, to deploy an instance of this API to your own or local test machine. The first few tests work pretty well, but every test is easily 200ms which can add up pretty quickly thanks to, for example, the overhead of HTTP.
Another problem is that it’s fairly easy to test your happy flows, but how do you test how your app performs on a slow network or when the API is under a heavy load and returns some weird errors. Or, when your test is mutating data in the API, how do you undo all mutations or ensure the begin and end state? You can ask the back-end team to implement some private API endpoints for this, but they won’t like it… (and neither should you!)

func testBackend() {
    //Given
    let expectation = expectationWithDescription("findByTitle")

    let apiClient = APIClient()
    let service: Service = Service(apiClient: apiClient)

    //When
    var mediaItem : MediaItem? = nil
    service.findByTitle("Rick & Morty") { (fetchedMediaItem:MediaItem?) in
        mediaItem = fetchedMediaItem

        expectation.fulfill()
    }

    //Then
    self.waitForExpectationsWithTimeout(5) { _ in
    }

    XCTAssertNotNil(mediaItem)
    XCTAssertEqual(mediaItem!.title, "Rick and Morty")
}
Class stubbing
When you also want to test scenarios which are hard or complex to reproduce with the live API, you have to create those scenarios yourself. You can do this by stubbing the class or piece of code that is communicating with the API to do exactly what we want it to do for our test. Read more on stubbing on Wikipedia.
In this example we stub the APIClient class, because obviously this class connects to our API. We create an StubbedAPIClient and let the findByTitle method return a HTTP code 500 error, which means ‘something’ went wrong while creating a response for us. Now we can easily see how our Service class reacts to this.
Now you have more control on what the APIClient should return in specific cases and are not depending on a live API anymore. Besides, the tests run much faster, because we skip networking and processing time of the API.

func testStubbed() {
    //Given
    let expectation = expectationWithDescription("findByTitle")

    let apiClient = StubbedAPICient()
    let service: Service = Service(apiClient: apiClient)

    //When
    var mediaItem : MediaItem? = nil
    service.findByTitle("Rick & Morty") { (fetchedMediaItem:MediaItem?) in
        mediaItem = fetchedMediaItem

        expectation.fulfill()
    }

    //Then
    self.waitForExpectationsWithTimeout(5) { _ in
    }

    XCTAssertNotNil(mediaItem)
    XCTAssertEqual(mediaItem!.title, "Rick and Morty")
}
Now we have a unit test for the Service class, but our Client class stays untested. We could create the same test for our Client class, but what class do we need to stub? Of course, we could be able to create stubs for the URLConnection classes, but there has to be an easier way…
note: in this example we are using stubbing, but another way could be mocking using a library like OCMock. This library lets you create mocks in a single line which can be used to verify behavior of the rest of your application. Read more on the difference between stubbing and mocking in an article by Martin Fowler.
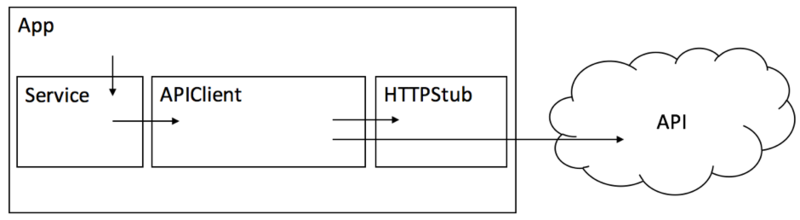
Network stubbing
There are libraries to stub networking on iOS, for example OHHTTPStubs. OHHTTPStubs catches all the requests your app makes, by hooking in on NSURLConnection and NSURLSession, and checks if you defined a stub for this specific request. If the request is stubbed, it won’t reach the backend. In addition, it has some cool features like delaying or dropping requests and responses, which makes testing unhappy flows much easier.
Now we have end-to-end testing that follows the whole code path for this feature.
func testStubbed() {
    //Given
    let expectation = expectationWithDescription("findByTitle")

    // http response stub
    stub(isMethodGET()) { _ in
        //load the stubbed_200.json file
        let stubPath = OHPathForFile("stubbed_200.json", self.dynamicType)

        //and return it with a couple of headers
        return fixture(stubPath!, headers: ["Content-Type":"application/json"])
    }

    let apiClient = APIClient()
    let service: Service = Service(apiClient: apiClient)

    //When
    var mediaItem : MediaItem? = nil
    service.findByTitle("Rick & Morty") { (fetchedMediaItem:MediaItem?) in
        mediaItem = fetchedMediaItem

        expectation.fulfill()
    }

    //Then
    self.waitForExpectationsWithTimeout(5) { _ in
    }

    XCTAssertNotNil(mediaItem)
    XCTAssertEqual(mediaItem!.title, "Rick and Morty")
}
To stub a request with this library you have to match the request and fabricate the response:
Match request
The first argument for stub() is the rule that should match the request URL. The second argument is a function that should return the response for the given request. If your app only performs a couple of request it’s easier to create a catch-all stub with isHost(“infi.nl”), if you want to be more specific with which requests your want to catch you should use a more specific matcher, like the example below matching on the absolute URL:
func testStubbedInLineJSON() {
    //Given
    let expectation = expectationWithDescription("findByTitle")

    let stubbedJSON = [
        "title_popular": [
            [
                "id": "tt2861424",
                "title": "Rick and Morty",
                "name": "",
                "title_description": "2013 TV series,     <a href='/name/nm1363595/'>Dan Harmon</a>...",
                "episode_title": "",
                "description": "2013 TV series,     <a href='/name/nm1363595/'>Dan Harmon</a>..."
            ]
        ]
    ]

    // http response stub
    stub(isMethodGET()) { _ in
        return OHHTTPStubsResponse(JSONObject: stubbedJSON, statusCode: 200, headers: .None)
    }

    let apiClient = APIClient()
    let service: Service = Service(apiClient: apiClient)

    //When
    var mediaItem : MediaItem? = nil
    service.findByTitle("Rick & Morty") { (fetchedMediaItem:MediaItem?) in
        mediaItem = fetchedMediaItem

        expectation.fulfill()
    }

    //Then
    self.waitForExpectationsWithTimeout(5) { _ in
    }

    XCTAssertNotNil(mediaItem)
    XCTAssertEqual(mediaItem!.title, "Rick and Morty")
}
Send response
If the request is matched, the function in the second argument is called to return an OHttpStubResponse object. There are multiple ways to do this, the easiest is to just create the object yourself using one of the constructors.
If you want to send a response body, like a json object or even an image, you can choose to construct the OHHTTPStubsResponse using a NSData object or the name of a file in your bundle. Inline json makes the test easier to read and more flexible to change, else you have to create a new text file for every variation you need. The statusCode and headers are obvious and could be copied from the actual response from the API.
If you’re not sure which requests your app makes, you can check this using a web proxy (Charles) or SWHttpTrafficRecorder.
Conclusion
As you can see it’s fairly easy to test your app independent from its API. Still, none of the methods are really bad. It all depends on the situation and what your goal is for the test you’re writing. If you have to work with a third party API and you want to verify your app stays compatible, then there is not much against testing with the real API.
In my next blog I will talk a bit more about useful stubbing in UIAutomation tests. If you have any questions, be sure to contact me at corne@infi.nl!