
Creating a Chrome extension with React and TypeScript
Chrome extensions are becoming increasingly complex, developers create solutions that enable pre-existing tools to scale and adapt. Frameworks like React, for example, improve web development and are even used — instead of vanilla JavaScript — for building web extensions. In this tutorial, we’ll build a browser extension using Chrome and React. We will create a template with the building blocks needed to build your very own Chrome extension.
What are Chrome extensions?
A Chrome extension is a system made of different modules (or components), where each module provides different interaction types with the browser and user. Examples of modules include background scripts, content scripts, an options page, and UI elements.
The first step toward building our extension is to create a React application. You can check out the full code in this GitHub repo.
Creating a React application with Create React App (CRA)
We can create a React app by using CRA.
npx create-react-app chrome-react-seo-extension --template typescript
With this skeleton application up and running, we start transforming it into an actual Chrome extension
Chrome extensions are web applications
A Chrome extension is a web application, we don’t need to adjust the application code. However, we do need to ensure that Chrome can load our application. We do this in the manifest.js file.
All of the configurations for the extensions belong in the manifest.js file.
This file is generated automatically by CRA. However, to be valid for an extension, it must follow the extension guidelines. For this tutorial we will use manifest version 3. Let’s update file public/manifest.json with the following code:
{
    "name": "Chrome React Extension",
    "description": "Template for creating Crome extensions with React",
    "version": "1.0",
    "manifest_version": 3,
    "action": {
        "default_popup": "index.html",
        "default_title": "Open the popup"
    },
    "icons": {
        "16": "logo192.png",
        "48": "logo192.png",
        "128": "logo192.png"
    },
}
Let’s explain the fields:
name: this is the name of the extensiondescription: description of the extensionversion: current version of the extensionmanifest_version: version for the manifest format we want to use in our project. Currently V2 and V3 are supportedaction: actions allow you to customize the appearance and behaviour of the buttons that appear on the Chrome toolbar. In this case when the button is clicked Chrome will load theindex.htmlfile.icons: set of extension icons
Building the application
To build a React application, run:
npm run build
This command calls react-scripts to build our application, generating the output in the build folder.
Loading the extension into your browser
The React app is now ready to be loaded as an extension into Chrome. To do this visit chrome://extensions/.On your Chrome browser and enable the developer mode toggle:

Then, click Load unpacked and select the build build folder of your React app. Chrome will load your extension and display it on the extensions page. It should look like this:

Your extension should also be visible in the extension toolbar. If you click on it, you will see the React demo application as a pop-up. This is how the popup should look like if you used the code from the GitHub repo.
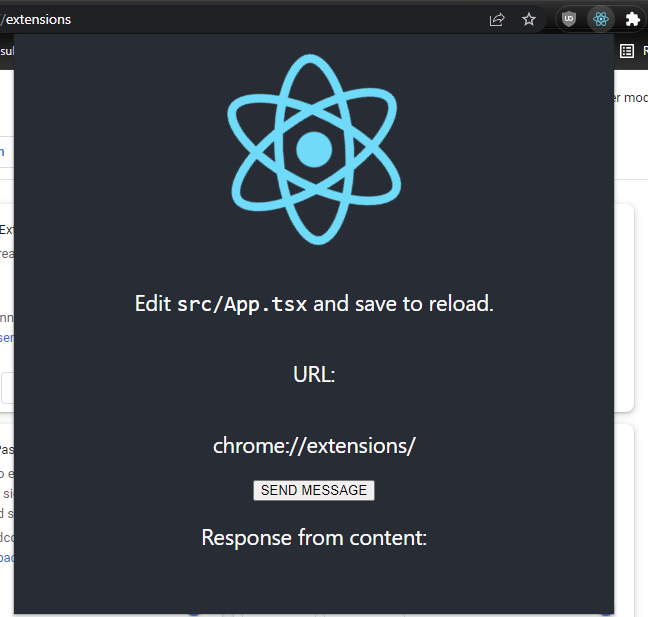
Building the pop-up
Your extension may not look like the one in the image above. As a start we can adjust the width and height of the body element.
Open the file index.css generated by React and change the body element to contain width and height.
body {
 width: 600px;
 height: 400px;
 ...
}
If you return to Chrome you won’t see any difference. This is because our extension only works with the compiled code. For every change in our extension itself, we must rebuild the code. This is a considerable downside. To minimize the work, you can run extensions as web applications and only run them as extensions for testing.
After rebuilding, Chrome will notice the changes automatically and refresh the extension for you.
Accessing the website contents
The React code runs isolated in the pop-up. It does not have any information about the browser information, tabs, and sites the user is visiting.
To access this the React app can use an injected global object called chrome.
The Chrome API allows our extension to interact with anything in the browser, including accessing and altering tabs and the websites they are hosting, do note that extra permissions will be required for such tasks.
The Chrome API does not include any methods to extract information from the DOM of a website. Fortunately Chrome has a solution for this called content scripts.
Content scripts are special JavaScript files that run in the context of web pages and have full access to the DOM elements, objects, and methods.
Our React app can interact with these content scripts trough message passing.
Using message passing
Message passing is a technique that allows different scripts running in different contexts to communicate with each other. Messages in Chrome are not limited to content scripts and pop-up scripts, and message passing also enables cross-extension messaging, regular website-to-extension messaging, and native apps messaging.
As you may expect, messages establish a connection between two parts, where one of the parts sends a request, and the other part can send a response, also known as one-time requests. There are other types of messages as well, which you can read about in the official documentation.
Implementing the project
In this section we will implement the following:
- Access to the Chrome API
- Permissions
The Chrome API is accessible through the global chrome object available in our React app. For example, we could directly use it to query information about the browser tabs through the API call chrome.tabs.query.
Trying this in our project will raise type errors. Our project doesn’t know anything about this chrome object. We can fix this by installing the right types:
npm install @types/chrome --save-dev
Update your manifest to include a new permissions key:
"permissions": [
   "activeTab"
],
Building content scripts to separate files
We learned that content scripts are JavaScript files that run within the context of web pages, these scripts are different and isolated from the React application. When executing npm run build React will generate only one file with the application code. We need to generate two files, one for the React app and another for the content scripts. This can be done with the help of an additional library called Craco.
CRA performs all the magic that is needed to run and build React applications, but it encapsulates all configurations, build settings, and other files into their library. Craco allows us to override some of these configuration files without having to eject the project.
To install Craco, run:
npm install @craco/craco
At the time of writing Craco does not fully support version 5.0 of the CRA. To solve this compatibility issue we can in stall an alpha version of Craco:
npm install @craco/craco@7.0.0-alpha.3
Next, create a craco.config.js file in the root directory of your project. We will override the build settings we need.
Let’s see how the file should look
const HtmlWebpackPlugin = require("html-webpack-plugin");
module.exports = {
    webpack: {
        configure: (webpackConfig, {env, paths}) => {
            return {
                ...webpackConfig,
                entry: {
                    main: [env === 'development' &&
                    require.resolve('react-dev-utils/webpackHotDevClient'),paths.appIndexJs].filter(Boolean),
                    content: paths.appSrc + '/chrome/content.ts',
                },
                output: {
                    ...webpackConfig.output,
                    filename: 'static/js/[name].js',
                },
                optimization: {
                    ...webpackConfig.optimization,
                    runtimeChunk: false,
                },
                plugins: [
                   ...webpackConfig.plugins,
                   new HtmlWebpackPlugin({
                    inject: true,
                    chunks: ["options"],
                    template: paths.appHtml,
                    filename: 'options.html',

                      }),
                ]
            }
        },
    }
}
CRA utilizes webpack for building the application. In this file, we override the existing settings with a new entry. This entry will take the contents from src/chrome/content.ts and build it separately from the rest into the output file static/js/[name].js, where the name is content, the key where we provided the source file.
At this point, Craco is installed and configured but is not being used. In your package.json, edit your build script to this:
"build": "craco build",
The only change we made is replacing react-scripts with craco.
Telling Chrome where to find content scripts
We generate a new file called content.js as part of our build project, but Chrome doesn’t know what to do with it, or that it even exists. We need to edit our manifest file such that the browser knows about this file, and that it should be injected as a content script. We do this on the manifest file.
In the manifest specification, there’s a section about content scripts. It’s an array of scripts, and each script must contain the file location and to which websites should be injected. Let’s add a new section in the manifest.json file:
"content_scripts": [
      {
        "matches": ["<all_urls>"],
        "js": ["./static/js/content.js"]
      }
  ],
With these settings, Chrome will inject the content.js file into any website
Receiving messages in the content script
import { ChromeMessage, Sender } from "../types";

type MessageResponse = (response?: any) => void

const validateSender = (
    message: ChromeMessage,
    sender: chrome.runtime.MessageSender
) => {
    return sender.id === chrome.runtime.id && message.from === Sender.React;
}

const messagesFromReactAppListener = (
    message: ChromeMessage,
    sender: chrome.runtime.MessageSender,
    response: MessageResponse
) => {

    const isValidated = validateSender(message, sender);

    if (isValidated) {
        response(document.title);
    }

}

const main = () => {
    console.log('[content.ts] Main')
    /**
     * Fired when a message is sent from either an extension process or a content script.
     */
    chrome.runtime.onMessage.addListener(messagesFromReactAppListener);
}

main();
There are three key lines of code:
- Registering a message listener
- Listener function declaration (
messagesFromReactAppListener) sendResponse(defined as a parameter from the listener function)
Now that our content script can receive messages and dispatch a response, we need to send a message from our React app.
Sending a message from our React app
Our application can interact with the Chrome API and send messages to our content scripts.
Sending a message to a content script requires us to identify which website will receive it. If you remember from a previous section, we granted the extension access to only the current tab, so let’s get a reference to that tab.
Getting the current tab is well documented. We query the tabs collection with certain parameters, and we get a callback with all the references found.
chrome.tabs && chrome.tabs.query({
   active: true,
   currentWindow: true
}, (tabs) => {
   // Callback function
});
With the reference to the tab, we can then send a message that can automatically be picked by the content scripts running on that site.
// Create a message object
const message: ChromeMessage = {
      from: Sender.React,
      message: "Hello from React",
}

chrome.tabs.sendMessage(
// Current tab id
          id,
          message,
// Callback executed when the content script sends a response
          (responseFromContentScript) => {
              setResponseFromContent(responseFromContentScript);
          });
  });
We create a message object and send it trough the message passing API to the content script. The content script which is listening for these messages will receive it and send back a response. Check out the full example to see how the template handles the message received from the content script!
Conclusion
We introduced many new concepts and ideas about how extensions work, their different modules, and how they communicate. We also discussed a basic template, making use of the full power of React and TypeScript. Thanks for reading!
For reference here is the link to the full code: GitHub repo
Bonus, Service workers and options page
The GitHub repo also includes a service workers and an options page. You can read more about service workers and the options pages here and here. Enjoy!